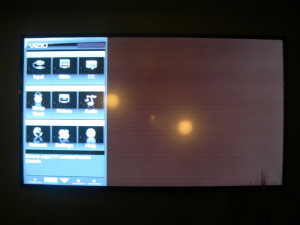
Those scrambled pixels, faded colour and black screen on your Vizio E701i-A3 LED TV may be caused by a faulty T-Con board.
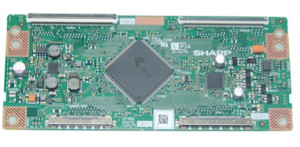
The problem is a 8 pin eprom chip failure on the lower right side of the RUNTK5261TPZH timing control board (T-Con) that interrupts the video signal to the Main board.
This T-Con board failure is happening at 500 hours of usage and according to VIZIO affects those E701i-A3 TVs with serial numbers from LFTRNXAN4500001 to LFTRNXAN4702936.
If your VIZIO E701i-A3 is older than a year, your warranty will not cover the replacement costs for a new T-Con board. Fortunately the replacement RUNTK5261TPZH T-Con board is available for sale online for under $150.
Replace the RUNTK5261TPZH T-Con board
Equipment needed:
- Antistatic plastic gloves or antistatic bracelet
- Pad/ towel
- Needle-nose pliers
- Electric Flat head and Philips screwdriver
- Cup for screws
Step-by-step instructions
- Put on the rubber gloves bef
- Turn the VIZIO E701i-A3 television off. Unplug the power cord.
- Remove the TV from the wall, if mounted.
- Lay the VIZIO E701i-A3 TV on a flat, padded surface.
- Remove the TV stand by loosening the screws at the base. Both the stand and post must be removed in order to remove the back panel.
- Go to the back of the panel.
- Remove all the screws holding the back panel in place. Put the screws to one side.
- Remove the back panel from the E701iA3.
- The RUNTK5261TPZH T-Con board is located in the middle top of the back panel, usually under an aluminum cover held in place by four corner screws. It may also be held in place with foil tape at the top. It’s connected to the Main board through a black LVDS cable and flat ribbon cables.
- Remove the ribbon cable first. Flip up the black tabs on the connector. Gently pull the cable out taking care not the scratch the ribbon section. Never use any sharp objects to open the black tabs as this can damage the pins making the connection faulty.
- To remove the LVDS cable, squeeze the small tab on side. Don’t force anything apart or pull anything too hard as this can damage the connections and cause more problems.
- Loosen the screws holding the RUNTK5261TPZH T-Con board in place. Place it to one side. This board is considered e-waste and should be sent to a recycling facility. Do not place into regular garbage.
- NOTE: Be sure to put on your rubber gloves before touching the new T-Con board. Hold the RUNTK5261TPZH T-Con board by the edge and avoid touching any of the components since they are very sensitive to electrostatic charges.
- Verify the manufacturers number for your board. (It will be found under the bar code.) Place the new board onto the back panel.
- To re-install the ribbon cable: Match the line on the ribbon cable with the edge of the connector making sure the ribbon is straight. Press down on the tab to lock it into place.
- Re-connect the LVDS cable by putting the connector end into the RUNTK5261TPZH T-Con board until it clicks into place.
- Tighten the screws on the board. Replace any foil tape.
- Replace the RUNTK5261TPZH T-Con cover. Tighten the screws.
- Place the back cover back onto the VIZIO E701i-A3 TV and tighten all the screws.
- Re-install the stand and post. Remount the VIZIO E701i-A3 TV.
Alternative part numbers
The RUNTK5261TPZH T-Con board is also sold under the following numbers:
The post Install a RUNTK5261TPZH T-Con board into the Vizio E701i-A3 LED TV appeared first on DLP Lamp Guide - LCD and DLP Repair Tips - Fix Your DLP - FixYourDLP.com.


